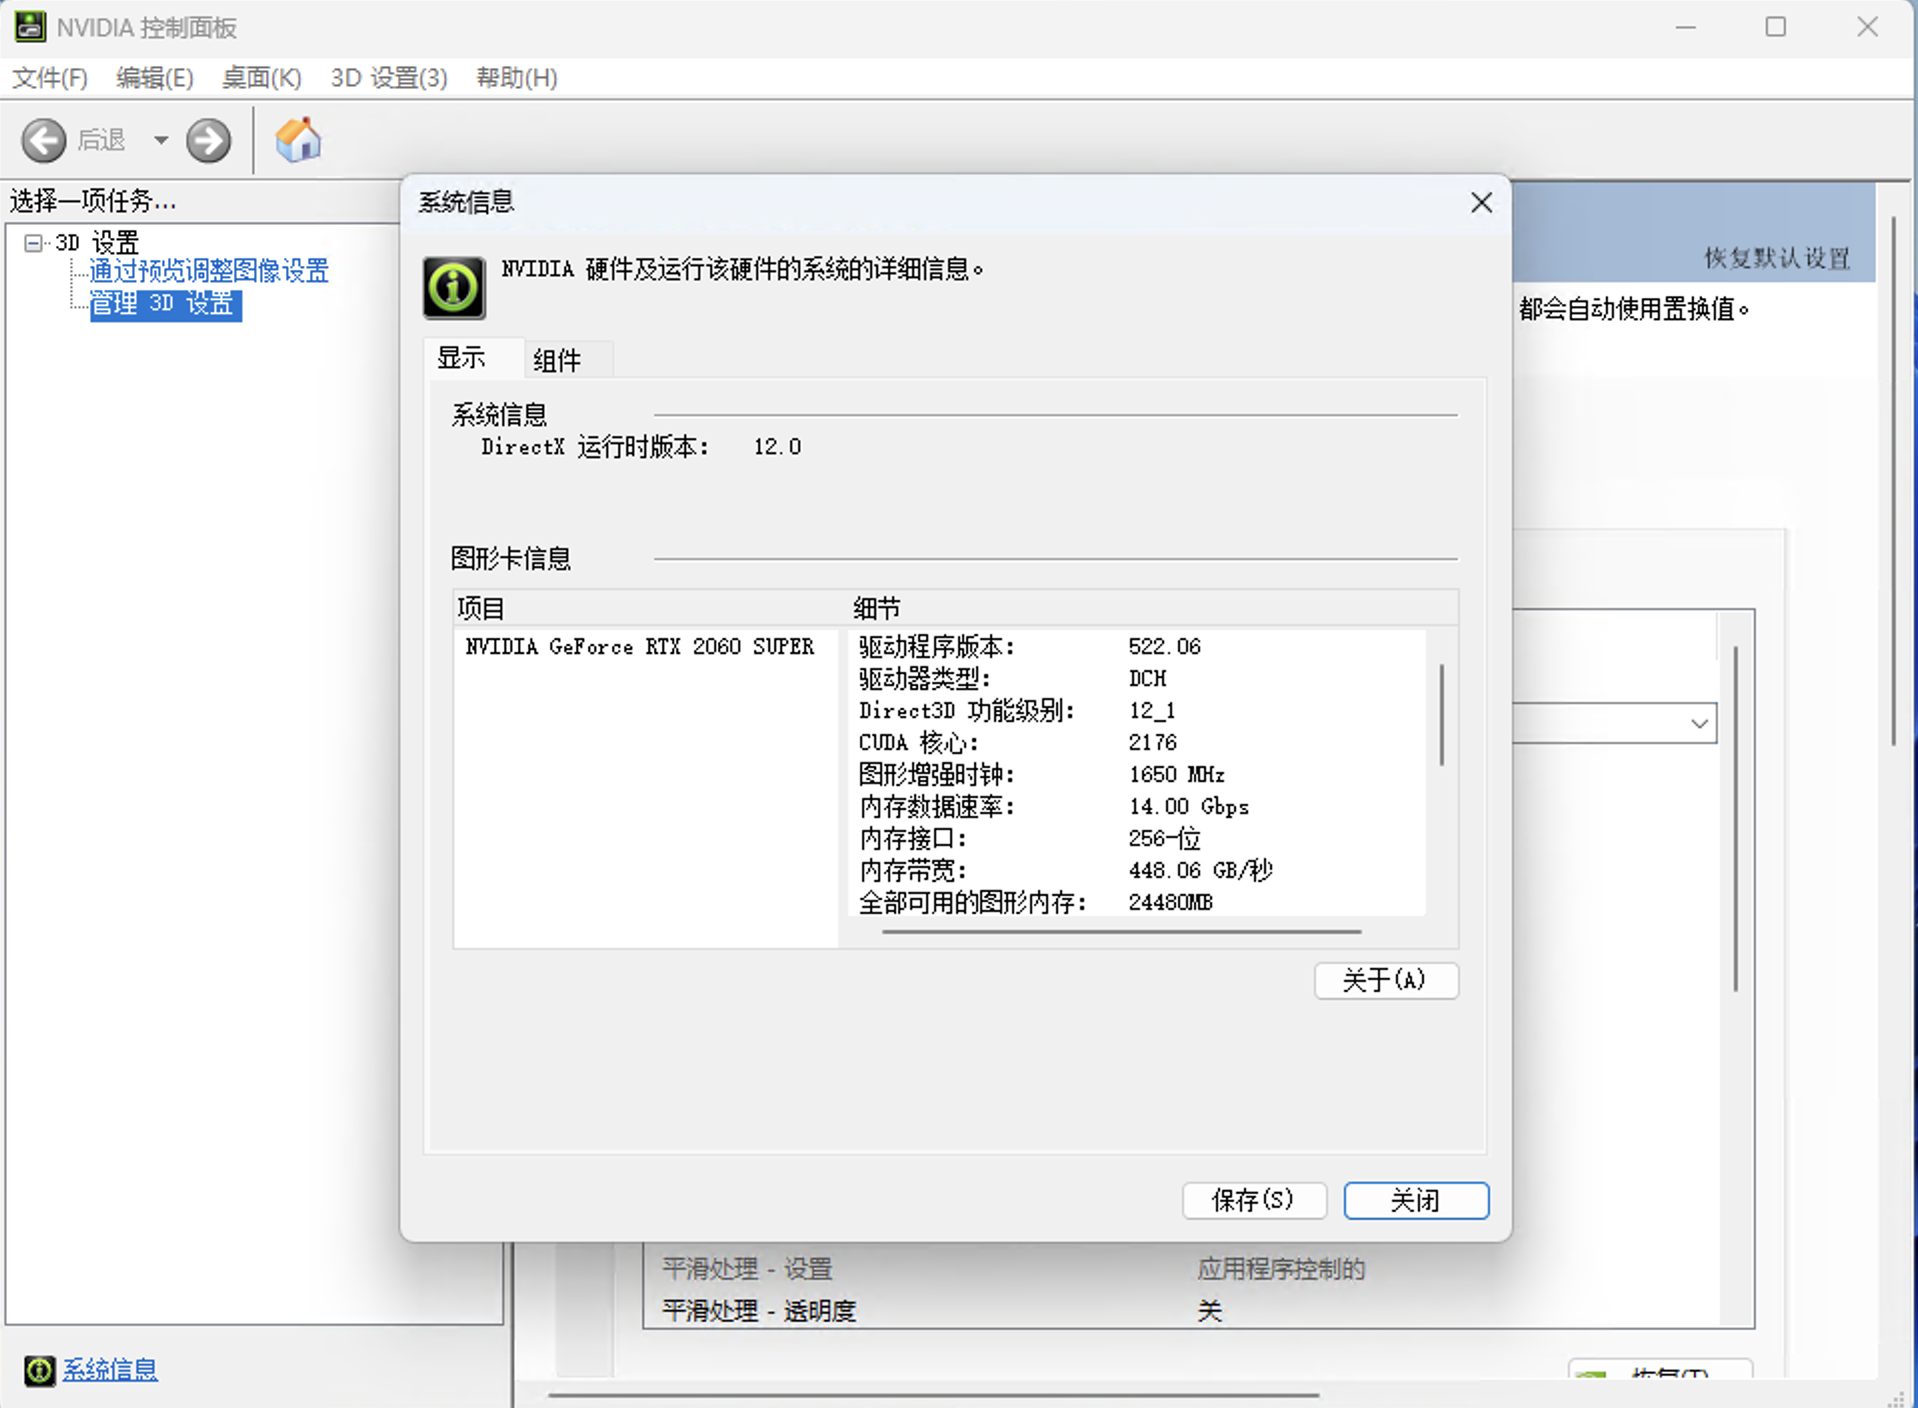
环境部署 cuda和cuDNN环境配置 检查自己的英伟达驱动版本
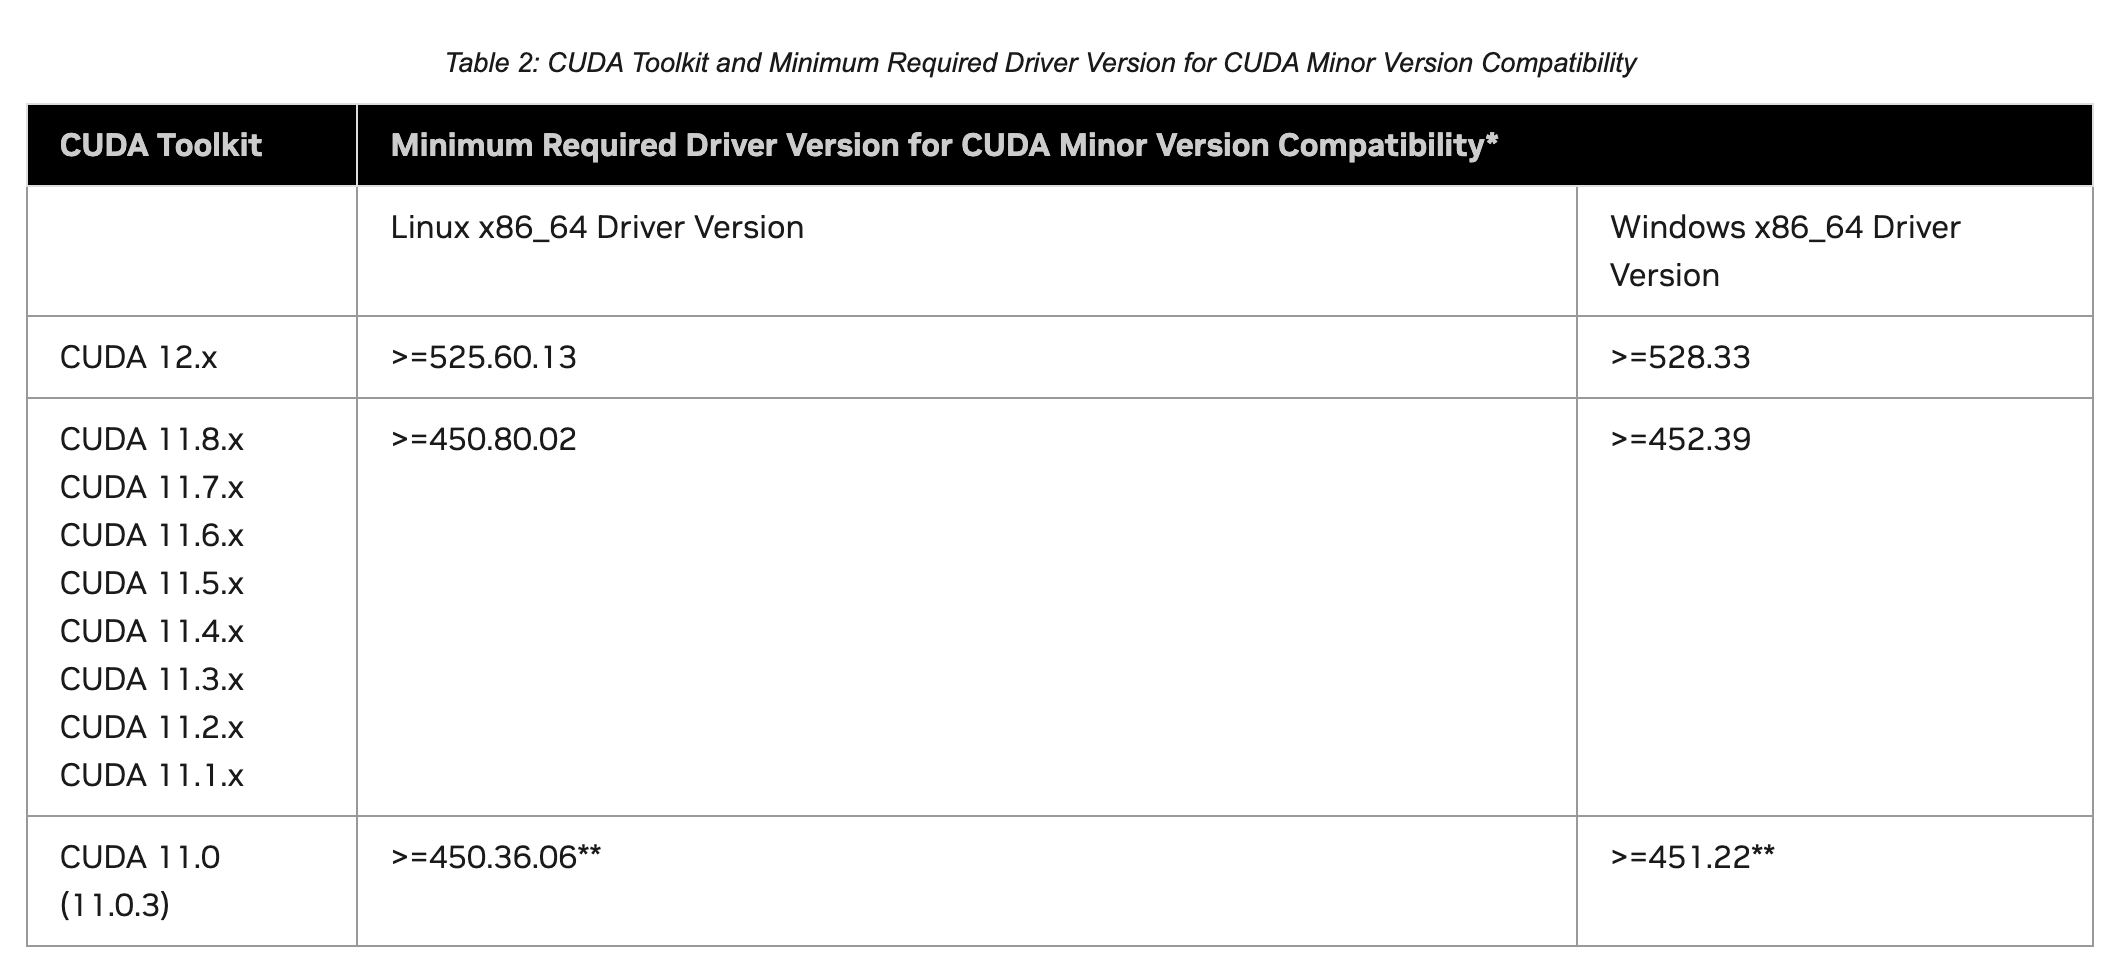
根据对应表选择合适的cuda版本
建议选择cuda11.8即可
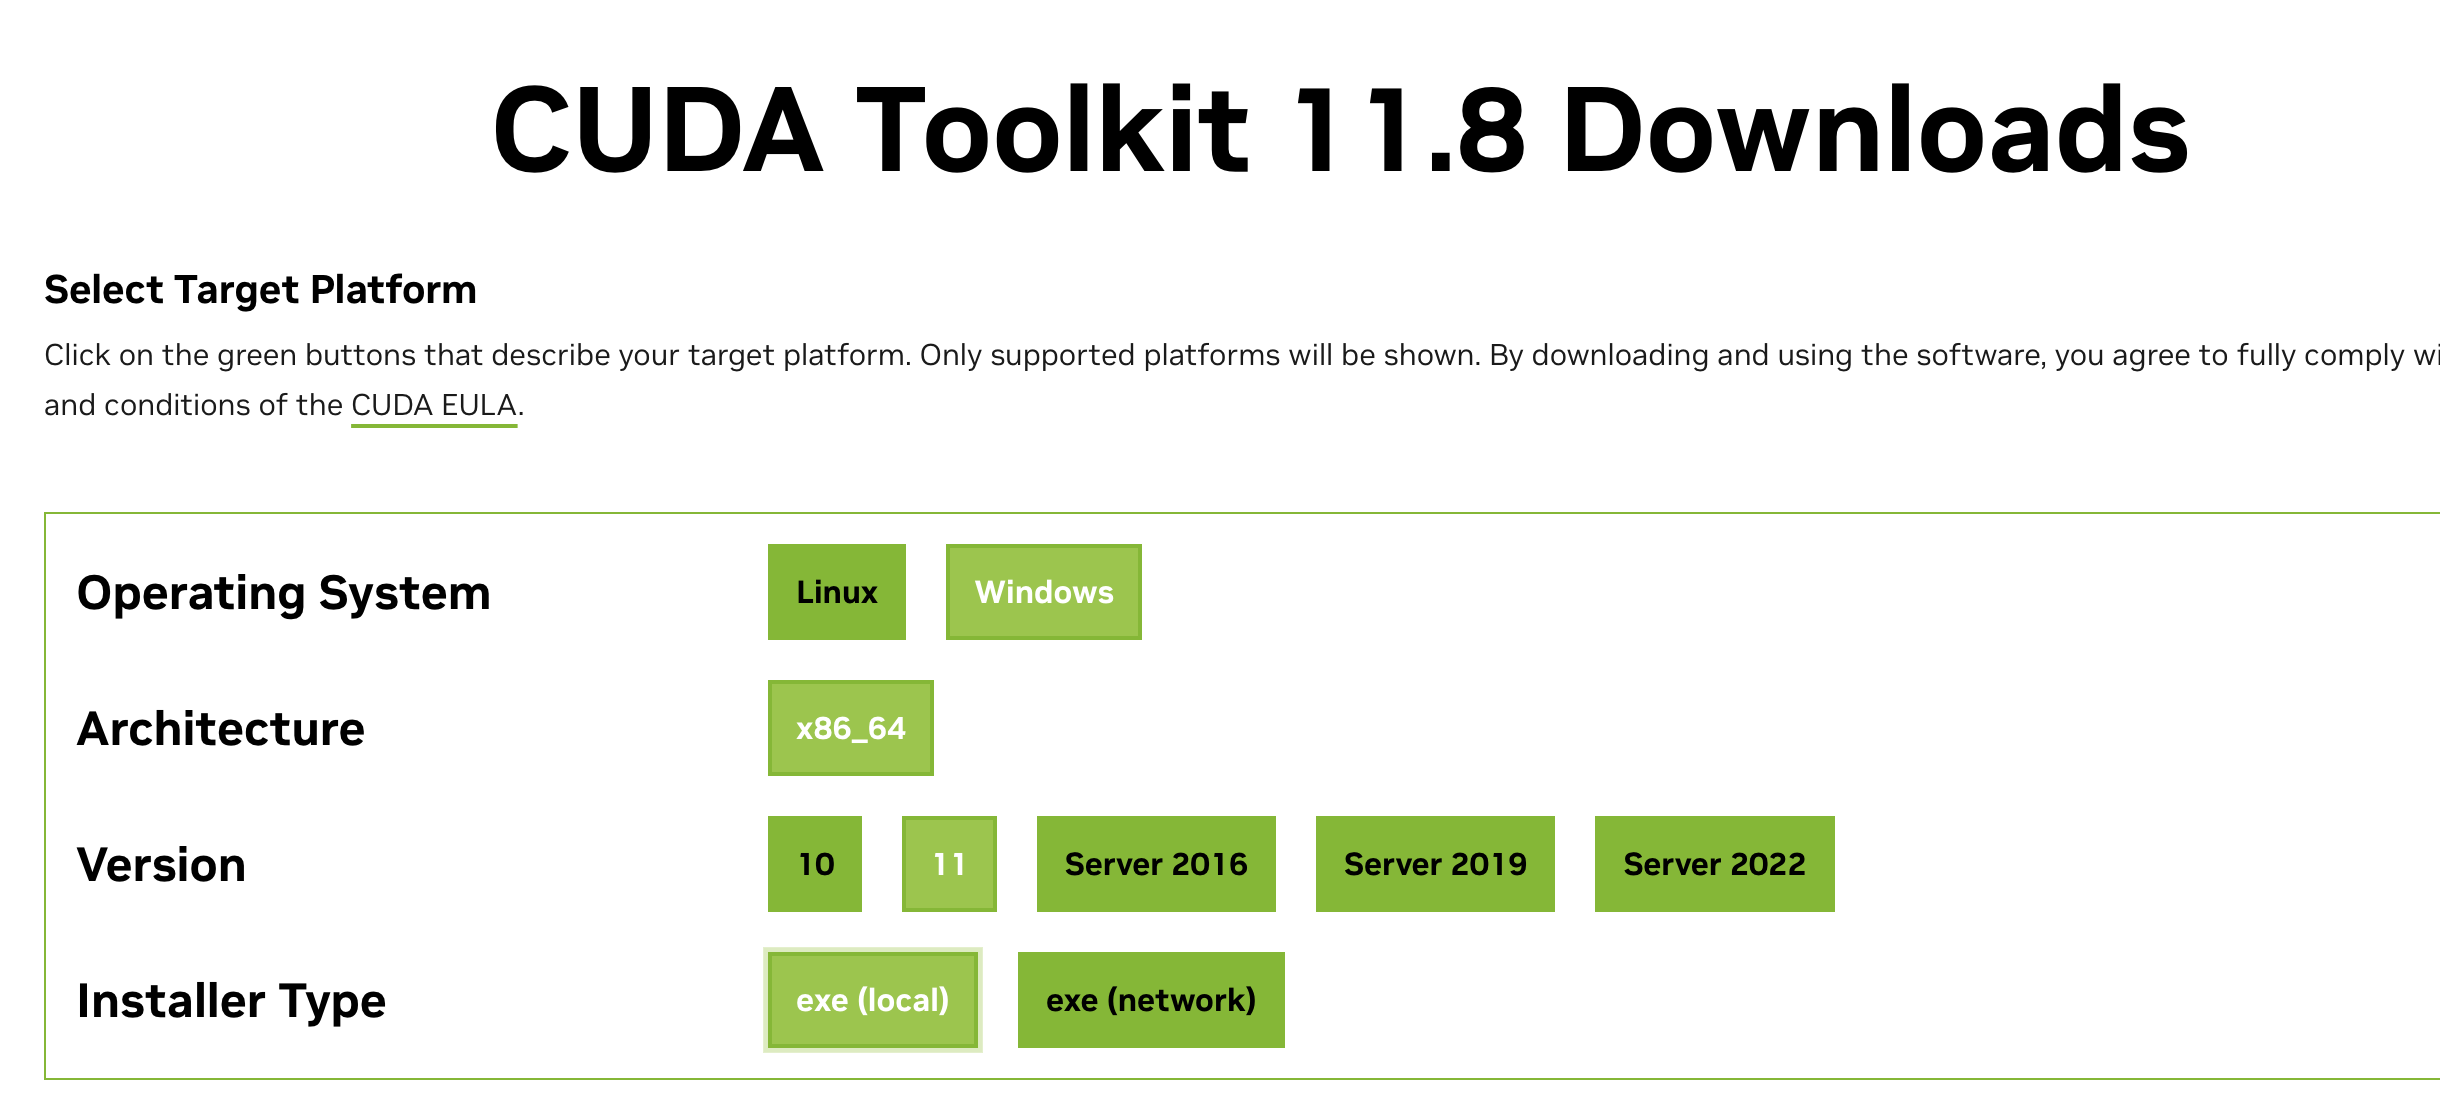
下载并安装cuda和cuDNN https://developer.nvidia.com/cuda-toolkit-archive https://developer.nvidia.com/cudnn-downloads
如图下载本地安装包,避免网络问题
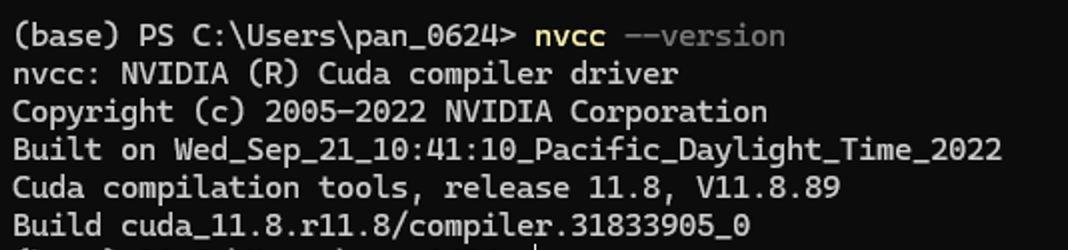
命令行输入nvcc –version 如果返回如下信息证明安装成功
接下来进行cuDNN配置
目前暂时没有win11专用版本,使用win10版本没影响
1 C :\Program Files \NVIDIA GPU Computing Toolkit \CUDA \v11.8
将下载下来的cuDNN压缩包内bin,include,lib文件夹复制到前面给的路径内即可
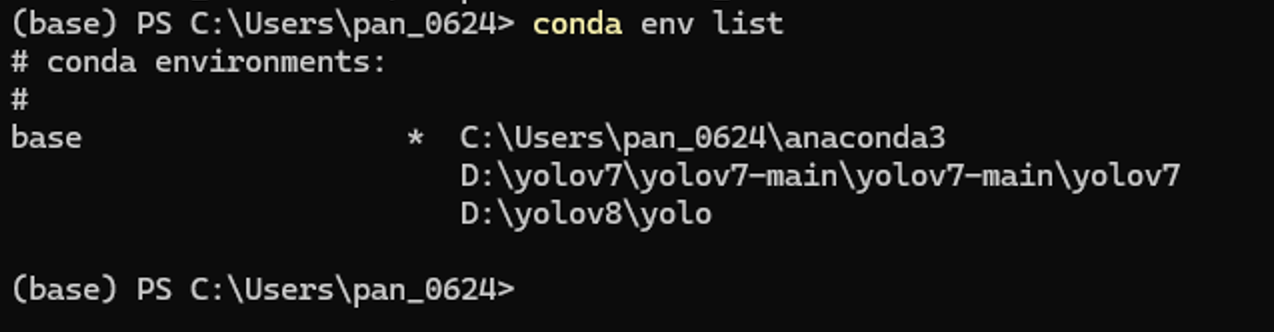
python虚拟环境配置 conda安装使用请自行参考教程,可能碰到的问题链接https://blog.csdn.net/u010393510/article/details/130715238
首先使用conda创建环境
1 conda create -p D :\yolov8\yolo python=3.9
需要注意这里的参数 -p为指定路径在D:\yolov8\路径下创建一个名为yolo的虚拟python环境,并且指定python版本为3.9,这样做的好处是python环境直接下载到当前项目内,不需要做链接,项目转接给别人也能快速上手
这里可以看到对应路径下环境已经存在,需要注意yolo文件夹下放的是虚拟环境相关文件
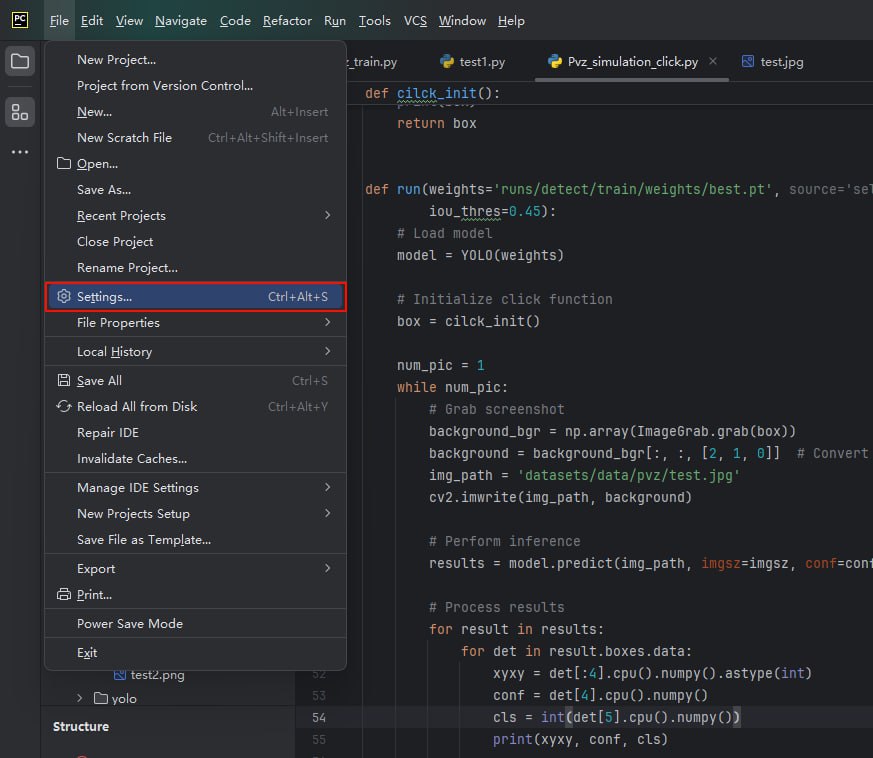
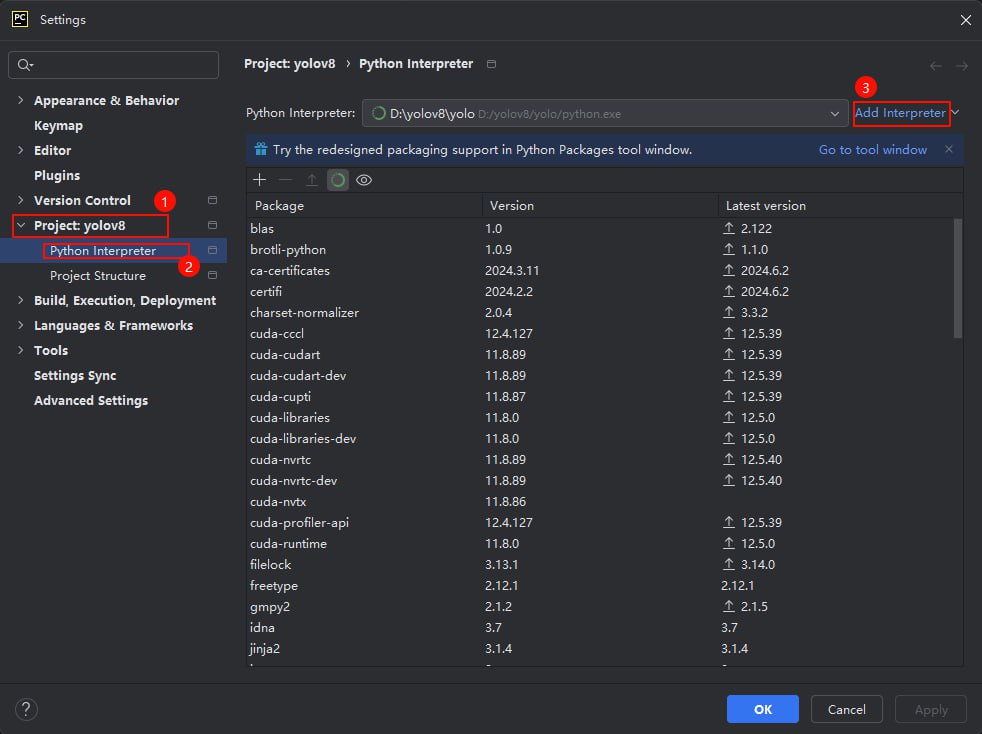
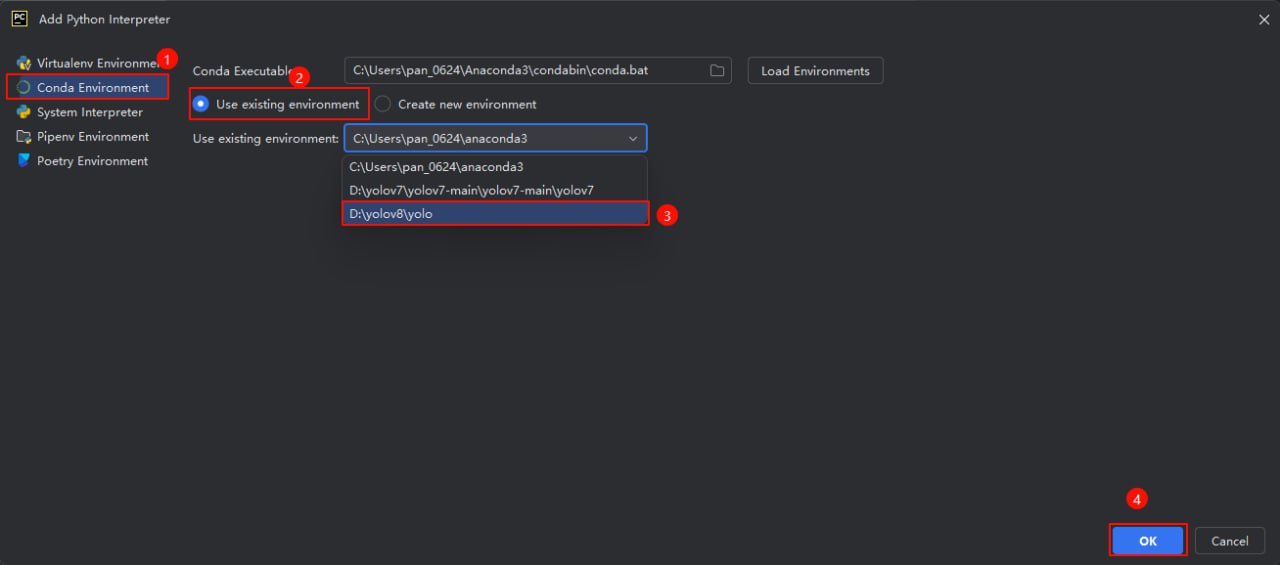
但是在对于包管理以及后续脚本运行不是很方便这里我们使用pycharm来管理整个项目并导入这个已经存在的conda环境
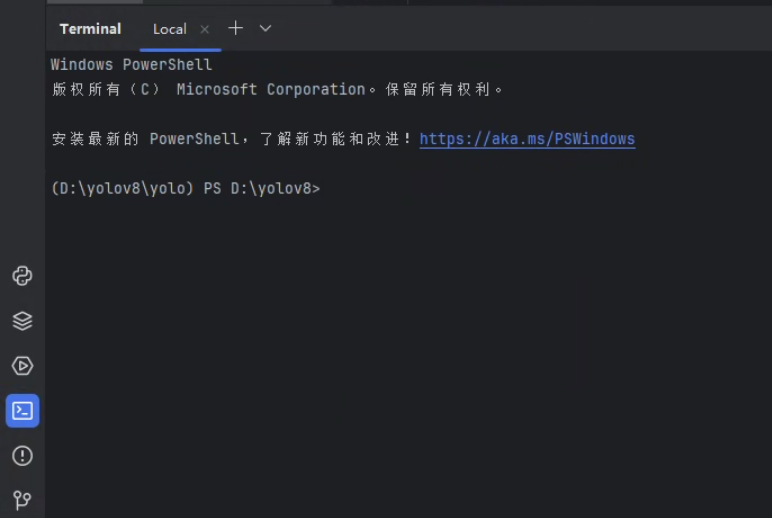
pycharm打开整个项目文件夹
打开pycharm自带的终端
powershell前面括号如图显示证明配置正确
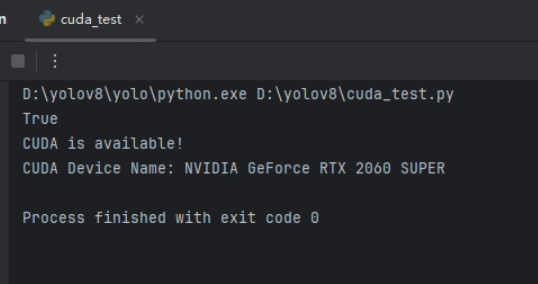
依赖下载 首先不要进行 pip install -r requirements.txthttps://pytorch.org/get-started/locally/
1
2
3
4
5
6
7
8
9
10
11
import torchprint (torch.cuda.is_available())if torch.cuda.is_available(): print ("CUDA is available!" ) print ("CUDA Device Name:" , torch.cuda.get_device_name(0 )) else : print ("CUDA is not available." )
随后执行
1
2
3
pip install -r requirements.txt pip install ultralytics
验证yolo环境
1 yolo predict model=yolov8n.pt source='https://ultralytics.com/images/bus.jpg'
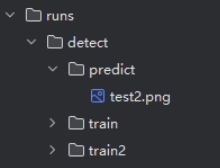
在路径runs/detect/predict下可以看见一张标注出红框的图片即表示安装成功
模型训练 配置文件 本项目的目的只是为了对对象进行识别,不需要对轮廓进行分割等操作,所以使用ultralytics训练好的预训练模型yolov8n.pt,首先在官网查看coco8的配置文件进行参考
1 2 3 4 5 6 7 8 9 10 11 12 13 14 15 16 17 18 19 20 21 22 23 24 25 26 27 28 29 30 31 32 33 34 35 36 37 38 39 40 41 42 43 44 45 46 47 48 49 50 51 52 53 54 55 56 57 58 59 60 61 62 63 64 65 66 67 68 69 70 71 72 73 74 75 76 77 78 79 80 81 82 83 84 85 86 87 88 89 90 91 92 93 94 95 96 97 98 99 100 path: ../datasets/coco8 train: images/train val: images/val test: names: 0: person 1: bicycle 2: car 3: motorcycle 4: airplane 5: bus 6: train 7: truck 8: boat 9: traffic light 10: fire hydrant 11: stop sign 12: parking meter 13: bench 14: bird 15: cat 16: dog 17: horse 18: sheep 19: cow 20: elephant 21: bear 22: zebra 23: giraffe 24: backpack 25: umbrella 26: handbag 27: tie 28: suitcase 29: frisbee 30: skis 31: snowboard 32: sports ball 33: kite 34: baseball bat 35: baseball glove 36: skateboard 37: surfboard 38: tennis racket 39: bottle 40: wine glass 41: cup 42: fork 43: knife 44: spoon 45: bowl 46: banana 47: apple 48: sandwich 49: orange 50: broccoli 51: carrot 52: hot dog 53: pizza 54: donut 55: cake 56: chair 57: couch 58: potted plant 59: bed 60: dining table 61: toilet 62: tv 63: laptop 64: mouse 65: remote 66: keyboard 67: cell phone 68: microwave 69: oven 70: toaster 71: sink 72: refrigerator 73: book 74: clock 75: vase 76: scissors 77: teddy bear 78: hair drier 79: toothbrush download: https://ultralytics.com/assets/coco8.zip
大致结构如下
1
2
3
4
5
6
7
8
9
10
11
12
path: ../datasets/coco8 train: images/train val: images/val test: names: 0: person 1: bicycle 2: car 3: motorcycle
进行修改
1
2
3
4
5
6
7
8
9
10
path: D:\yolov8\datasets\pvz train: images val: images names: 0: common 1: hat 2: cat 3: iron 4: sun
这里对于僵尸头上带的物品,及僵尸头本身,和阳光进行了标注
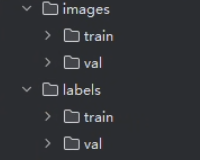
文件路径 1 2 3 4 5 6 datasets |--coco8 |__pvz |--images |--labels |__pvztrain.yaml
这里需要注意的是images和labels下面还有train和val(验证)对应数据和文件夹
数据标注 先把图片分成train和val两部分塞入images下两个对应文件夹,再批量重命名为序号.jpg
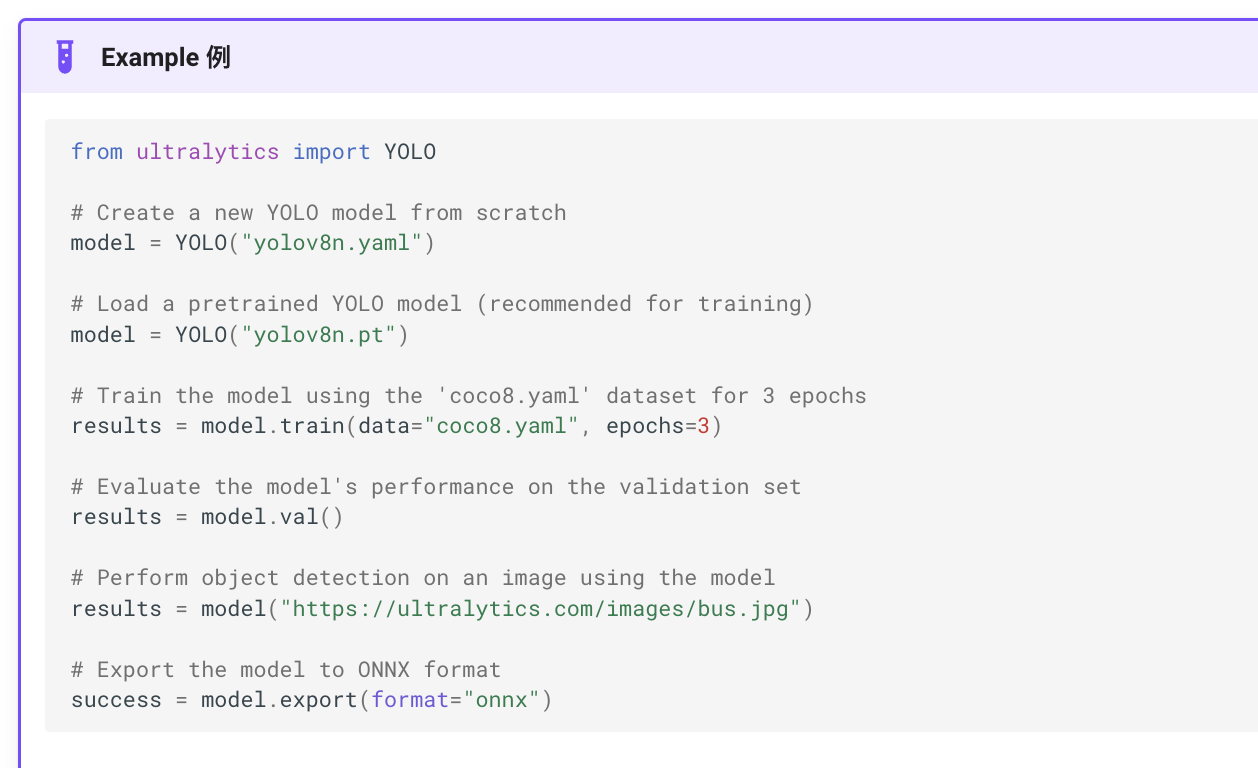
开始训练 参考一下官网提供的示例脚本
我们的数据集并不大只有不到200张图片,所以不需要特意设置onnx格式提高速度并降低精度,同样对于使用模型检测一张图片也不需要,后续通过另外的脚本直接截取视频流进行检测
1 2 3 4 5 6 7 8 9 10 11 12 13 14 15 from ultralytics import YOLOdef main (): model = YOLO("yolov8n.pt" ) model.train(data="datasets/pvz/pvztrain.yaml" , epochs=250 ,patience=150 ) model.val() if __name__ == "__main__" : main()
执行这个脚本,会在run路径下生成对应文件和模型
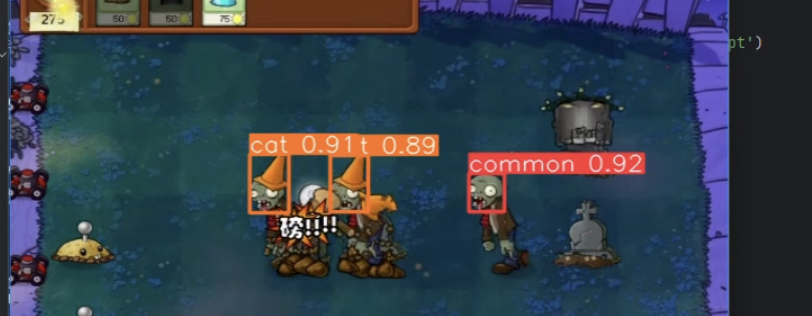
测试效果 这里对于测试模型效果,因为训练过程中就能看到拟合程度已经很高,所以直接下载了一个敲僵尸的游戏视频进行目标检测
1 2 3 4 5 6 7 8 9 10 11 12 13 14 15 16 17 18 19 20 21 22 23 24 25 26 27 28 29 30 31 32 33 34 35 36 37 38 39 40 41 42 43 from ultralytics import YOLOimport cv2import numpy as npmodel = YOLO('runs/detect/train/weights/best.pt' ) cap = cv2.VideoCapture('test/test2.mp4' ) while cap.isOpened(): success, frame = cap.read() if not success: break results = model.predict(frame) if results: boxes = results[0 ].boxes.xyxy.cpu().numpy() classes = results[0 ].boxes.cls.cpu().numpy() annotated_frame = results[0 ].plot() annotated_frame = cv2.resize(annotated_frame, (640 , 480 )) cv2.imshow('YOLOv8 Detection' , annotated_frame) else : cv2.imshow('YOLOv8 Detection' , frame) if cv2.waitKey(1 ) & 0xFF == ord ('q' ): break cap.release() cv2.destroyAllWindows()
随意截取一帧,能看到识别精度很高
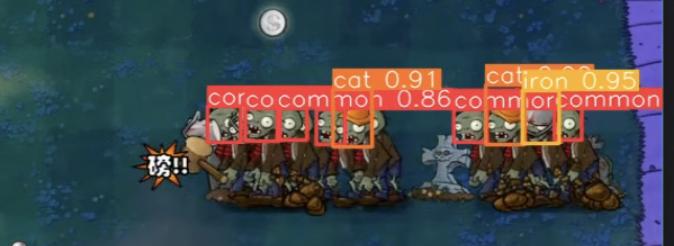
对于复杂情况,抗干扰能力也很强
模拟点击 对于模拟点击的部分,直接使用的pyautogui库模拟的点击,使用win32gui来抓取的窗口
1 2 3 4 5 6 7 8 9 10 11 12 13 14 15 16 17 18 19 20 21 22 23 24 25 26 27 28 29 30 31 32 33 34 35 36 37 38 39 40 41 42 43 44 45 46 47 48 49 50 51 52 53 54 55 56 57 58 59 60 61 62 63 64 65 66 67 68 69 70 71 72 73 74 75 76 77 78 79 80 import argparseimport osimport platformimport sysfrom pathlib import Pathimport cv2import torchfrom ultralytics import YOLOimport pyautoguifrom PIL import ImageGrabimport win32gui, win32con, win32com.clientimport numpy as npimport timedef cilck_init (): hwnd = win32gui.FindWindow(None , '植物大战僵尸中文版' ) print (hwnd) shell = win32com.client.Dispatch("WScript.Shell" ) shell.SendKeys('%' ) win32gui.SetForegroundWindow(hwnd) window_x, window_y, right, bottom = win32gui.GetWindowRect(hwnd) box = (window_x, window_y, right, bottom) print (box) return box def run (weights='runs/detect/train/weights/best.pt' , source='self_data/pvz' , imgsz=640 , conf_thres=0.25 , iou_thres=0.45 ): model = YOLO(weights) box = cilck_init() num_pic = 1 while num_pic: background_bgr = np.array(ImageGrab.grab(box)) background = background_bgr[:, :, [2 , 1 , 0 ]] img_path = 'datasets/data/pvz/test.jpg' cv2.imwrite(img_path, background) results = model.predict(img_path, imgsz=imgsz, conf=conf_thres, iou=iou_thres) for result in results: for det in result.boxes.data: xyxy = det[:4 ].cpu().numpy().astype(int ) conf = det[4 ].cpu().numpy() cls = int (det[5 ].cpu().numpy()) print (xyxy, conf, cls) pyautogui.click(box[0 ] + xyxy[0 ], box[1 ] + xyxy[1 ] + 20 ) num_pic += 1 def main (): parser = argparse.ArgumentParser() parser.add_argument('--weights' , type =str , default='runs/detect/train/weights/best.pt' , help ='model path' ) parser.add_argument('--source' , type =str , default='self_data/pvz' , help ='source' ) parser.add_argument('--imgsz' , type =int , default=640 , help ='image size' ) parser.add_argument('--conf-thres' , type =float , default=0.25 , help ='confidence threshold' ) parser.add_argument('--iou-thres' , type =float , default=0.45 , help ='IOU threshold' ) opt = parser.parse_args() run(opt.weights, opt.source, opt.imgsz, opt.conf_thres, opt.iou_thres) if __name__ == "__main__" : main()
成果展示